Friday, December 31, 2010

Last 3 days of Holiday Mini Catalogue!

 HAPPY NEW YEAR's Eve!!!!!!


 Just a reminder:

Only 3 days left to get your Holiday Mini products! This was such a fantastic Holiday Catalogue, I really hope they bring back some of my favourites into the new Catalogue in July!  Here's a list of my fave items from this years Holiday mini....


Clear Tinsel Trim
Glass Glitter - but on Jan.4 they have Baja Breeze Glass Glitter!! SO exciting!
French Foliage Stamp Set - soooo beautiful!!!
 Candy Cane Designer Fabric and Big Designer Buttons!

There may only be 3 days left for this Mini Catalogue, but that means only 4 more days til the new Occasions Mini!!! Let me tell you, it's a doozy!!! Stampin' Up! just keeps getting better and better!

Get your last minute Holiday Mini stuff now before time runs out!


Valentine Defined Card #3

Now this card isn't very Vintage-y but I wanted to showcase the other cute stamps from the new up-coming stamp set Valentine Defined.


Here I coloured each stamp with markers, cut them into 1 1/2" squares, matted them on Cherry Cobbler Cardstock, matted that on some Love Letter DSP, glued that on a Basic Black Card and added some Real Red Satin Ribbon. 


I just LOVE the Bleeding Hearts and Flamingos!


Thursday, December 30, 2010

Vintage Valentine #2


I decided to switch the colour scheme up and do Basic Grey and Pretty in Pink. These colours are so cute together. Here I used some First Edition DSP from the new Occasions Mini, it's such a great deal, 24 sheets for only $14.95, you get 4 of each 6 designs! I also used the Valentine Defined stamp set. This set has so many cute images. Check back tomorrow for my next card featuring this stamp set!


I used Antique Brads and Victoria Lace Trim. ( the heart pin is not SU!)


Wednesday, December 29, 2010

Vintage Valentine #1

I'm really getting into the Valentine mood lately...and you know how much I love Vintage cards! So I'm going to be posting a vintage inspired Valentine's card everyday for the next week.
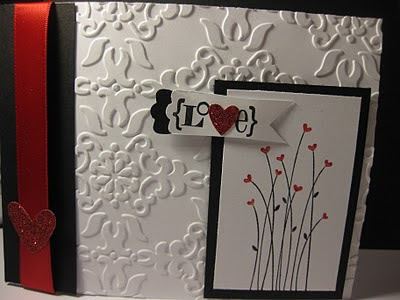
My first card uses some dry embossing with sponging, ripped paper and Basic Black/Cherry Cobbler colours.
All of my cards this week will be featuring the new Valentine Defined stamp set in the new Occasions Mini Catalogue starting Tuesday Jan.4!!!


 I love this definition of Valentine...so cute!

Stampin' Up! Products used:

Paper: Whisper White/Cherry Cobbler/Basic Black cardstocks, Love Letter DSP, First Edition DSP
Stamps: Valentine Defined
Ink: Basic Black, Crumb Cake
Embellishments: Mini Library Clip, Basic Pearls, Elegant Lines Embossing Folder, Big Shot


Sew Suite Candle

I just love all of the new Sew Suite stuff from the upcoming Occasions Mini Catalogue! Only 6 more days til it starts!!! January 4th!  If you need a catalogue, email me and I'll get one mailed to you!
I made this candle using the Sweet Stitches DSP, Big Designer Buttons, and Designer Fabric! These colours are so fun and go perfect together!


PomPom Trim in Melon Mambo....


Big Designer Buttons in Chocolate Chip and Daffodil Delight.. and Designer Fabric!  

Tuesday, December 28, 2010

Valentine Defined Preview...

Here's another sneak peek of the Occasions Mini Catalogue Stamp set  Valentine Defined. It's such a great Valentine's set with lots of cute hearts!


I also used the new Glimmer Paper and punched hearts out with the Heart to Heart Punch.
Stampin' Up! Products used:
Paper: Whisper White and Basic Black Cardstocks
Ink: Basic Black, Real Red
Stamps: Valentine Defined
Embellishments: Glimmer Paper, Real Red Satin Ribbon
Punches/Bigshot: Vintage Wallpaper Embossing Folder, Modern Label Punch

Saturday, December 25, 2010

Merry Christmas! - Simply Adorned Braclet gift....

Hope everyone is full of turkey and baked goods and enjoyed a fun day with family!! I just got home from a long day at work, but still enjoyed myself! I came to work in a good mood and didn't let anything get me down! Now I have the next 3 days off to relax, and maybe do a little shopping! 

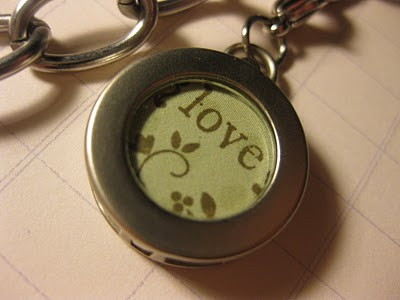
I've been waiting til today to show everyone my gift I made for my mom, it's the Simply Adorned Bracelet from Stampin' Up! This was my first experience with the Simply Adorned products, and I am very please with them!


 I used the Tiny Tags and the new set from Occasions Mini called You're a Gem.


Simply Adorned Charms:  5/8" Square and 5/8" Circle
Simply Adorned Chains: Bracelet 8"
Simply Adorned Baubles: Pink Crystal 5/8"  and Vanilla Pearl 1/2"

All of the components come in cute little boxes, perfect for wrapping up your completed project for a gift!  Like I did here:


Merry Christmas Everyone!!

Friday, December 24, 2010

Feliz Navidad!


Merry Christmas to Everyone!!!
Felices Fiestas!

I just had a wonderful turkey dinner at my boyfriends sisters house. It was nice to celebrate with them, since I live far away from my own family. Here's some samples of some Spanish christmas cards I made for his 2 sisters and niece. 

Here I used the Sweet Snowglobe stamp (a la carte stamp) with the Treat Cups and added some Glass Glitter for snow.


This card has a rich and regal tone to it. I used Bravo Burgundy Cardstock embossed with the Elegant Lines Embossing Folder, Gold embossed the Ornament and sentiment. Also sponged some Champagne shimmer paint.


This card has some Candy cane Designer Fabric and matching DSP....


Well, i'm off to bed, have to work in the morning...it sucks, but that's the life of working in the hospitality business...I'm looking forward to a few days off afterwards to relax and maybe do a little Boxing Day shopping with all my gift cards! :)
Stampin' Up! Products used:
All 3 cards used the Para las festividades (Spanish version of Four the Holidays)

Card 1:  Stamps: Snow Swirled, Sweet Snowglobe
Ink: Versa Mark, Basic Black
Paper: Marina Mist, Crumb Cake cardstock
Embellies: Iridescent Ice Embossing Powder, Glass Glitter

Card 2:  Stamps: Delightful Decorations
Ink: Versa Mark, Champagne Shimmer Paint
Paper: Bravo Burgundy,Basic Black cardstocks
Embellies: Glimmer Brads, Black satin ribbon, Gold Embossing Powder

Card 3: Stamps: A Cute Christmas
Paper: Marina Mist, Candy Cane DSP
Embellies: Candy Cane Designer Fabric, Glimmer Brads

Sew Suite Notebook!


This was my first chance to dive into my new Sew Suite stuff from my pre-order for the Occasions Mini (starts Jan.4) , and oh boy! this stuff is SEW CUTE!!! ;)  I'm working on some notebooks and here's the first one I've done. I used the Sweet Stiches Designer Series Paper, Designer Fabric and Designer Big Buttons! Aren't these colours just so perfect and fun together! There's Tangerine Tango, Melon Mambo, Chocolate Chip, Daffodil Delight, Tempting Turquoise, Wild Wasabi and Regal Rose....I think I got them all! So many great colours!

 Also a fun new embellishment....PomPom Trim!!! They come in 3 colours, here I used Melon Mambo. There is also Daffodil Delight and Tangerine Tango. Isn't that Designer Fabric so sweet! 
 Inside the notebook I added some more DSP and a little tag punched from one of the patterned DSP.

Now who wouldn't love this as a gift!! I know I would! ;) 


Merry Christmas Eve!!! :)

Thursday, December 23, 2010

SUO Challenge card

 This is a bonus post, my regular post is underneath!


This is a card I did for a Stampin' Up! Only Challenge. You have to use 3 colours: Bravo Burgundy, More Mustard and Very Vanilla, and feature dry embossing. This is what I came up with:


Stampin' Up! products used:
Paper: Bravo Burgundy, More Mustard and Very Vanilla cardstocks
Ink: More Mustard and Bravo Burgundy
Embellishments: More Mustard and Bravo Burgundy Grosgrain ribbon, Linen Thread, Basic Pearls, Very Vanilla Satin ribbon
Big Shot: Framed Tulips/Square Lattice Embossing Folders
Punches: Ornament, Decorative Lable
Stamps: Delightful Decorations, Snow Swirled


Golden Dasher...

With this card, I decided to do some gold embossing, something I haven't done yet, and i love it! I embossed the Dasher and the sentiment in gold. Used the Big Shot to cut the circle and scallop circle. The poinsettias are from the Deck the Halls DSP. That paper has so many beautiful classical Christmas images!


Stampin' Up! Products used:
Stamps: Dasher, Curly Cute
Paper: Crumb Cake/Basic Black Cardstocks, Deck the Halls DSP
Embellish: Gold Embossing Powder
Tools: Heat Tool, Versa Mark, BIG SHOT, Scallop Circles/Circles dies

Wednesday, December 22, 2010

December Stamp Club projects

Here's the projects we made this month at Allison's Stamp Club.
The technique of the month was the Faux Mosaic Tile, which I did a tutorial on yesterday, check that out below if you didn't see it!  Here's the sample we did:

Our card sample was a Very Merry Tiny Tags card:
And our 3D project was a cute little Christmas basket:


Allison also made us all a little Christmas gift! so cute!! a mini stamp and some ribbon!

Tuesday, December 21, 2010

Faux Mosaic Tile Tutorial

Happy Holidays everyone!
Today I decided to do a non-Christmasy card and show a wonderful technique we learned at Stamp Club this month. I'll post the Stamp club projects tomorrow, but today I wanted to try it myself in a Vintage vibe card. I'm using the new Nature Walk stamp set from the upcoming Occasions Mini starting January 4! So here's a step by step of the Mosaic Tile technique:


Step 1: Use your left over rubber scraps after assembling a stamp set, and cut into little pieces.

Step 2: Adhere the pieces to a cheap clear block, making a mosaic pattern.


Step 3: Stamp your image (works best with black) then colour in with markers or...

or colour with Blender Pens and ink...here I used Soft Suede, Crumb Cake and Marina Mist

Step 4: Take your Mosaic Stamp and ink it up with Versa Mark, stamp over your image trying not to get a 'crack' over an important part of the image (for example the birds face here)

Step 5: Dust your image with Clear Embossing Powder, flick off excess.

Step 6: Heat Tool it til the powder melts...

Then you'll get this Mosaic look once melted...

Step 7: Take your Basic Black ink pad and put directly on the image completely coating all the cracks.

Step8: Wipe of excess black ink with papertowel

Once all the ink is wiped off the embossed parts you'll see the 'Mosaic tiles'

And there ya go!! So pretty!

Enjoy!


Thanks to Allison for teaching me this awesome technique! Check back tomorrow for our December Stamp Club projects!

LinkWithin

Related Posts with Thumbnails